If your clone stamp is not working, it could be due to customized settings, or, you are working on a hidden layer, layer mask, or a transparent layer. The first step to fix issues with your clone stamp tool is to reset it. First select Clone Stamp Tool, then right-click the tool preset picker and reset the tool.
You can temporarily hide the layer mask by Shift-clicking on the mask to turn it off. If that does not help, check the layers panel to ensure the correct layer for sampling is selected, and the target layer is not hidden. To confirm that no layer is hidden, check on the eye icon on the left side of each layer at the layers panel. If there is a small empty box, click on it to make the layer visible.
Some users have reported the Clone Stamp and other tools stopped working immediately after updating Photoshop. In such cases, reverting to the earlier version can solve that. Below are common Photoshop Clone Stamp problems and how to fix them.
Photoshop Clone Stamp not showing preview
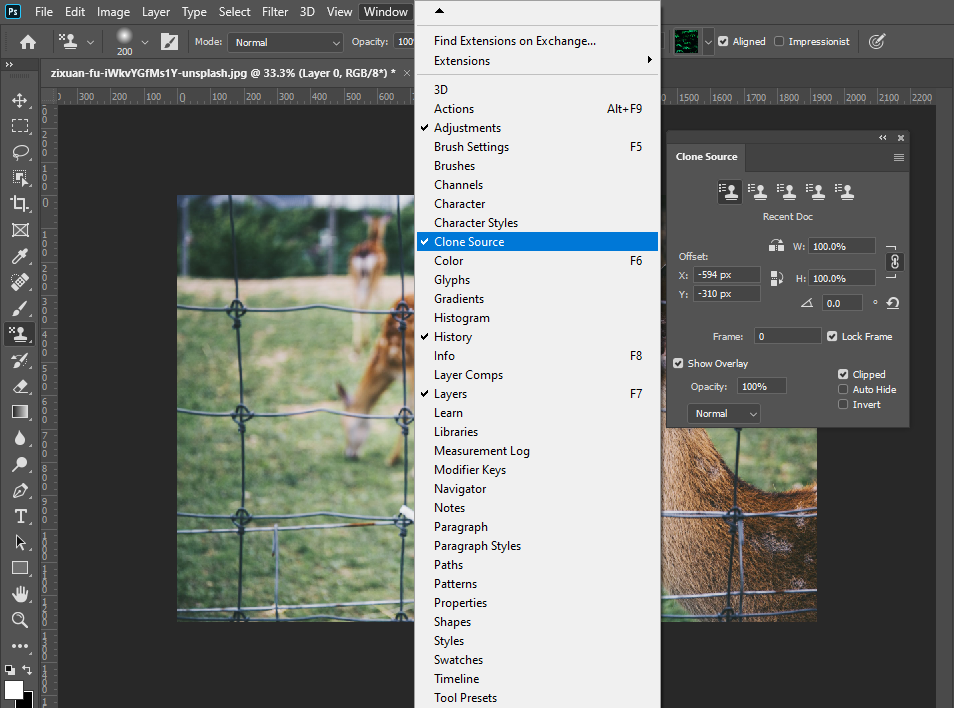
The clone Stamp preview helps you to precisely make image corrections. The ellipse preview helps you see which pixels you intend to clone. If the Photoshop clone stamp is not showing preview, it may have to do with your clone Source settings.
To fix it, select the Clone Stamp>Window>Clone Source and check Show Overlay. Make sure the blending mode is Normal and check Clipped on the right side menu. Also, ensure that Auto Hide and Invert are unchecked.
You can reset All Tools and if the problem persists, go to Edit>Preferences>General (Keyboard short cut Ctrl + K for PC and Command + K for Mac)>Reset Preferences On Quit. Restart Photoshop and default settings should have been applied.
The Clone stamp preview not showing is a common problem with CS5 and below versions of Photoshop. Consider getting a higher version of Photoshop if updating the current version does not solve the problem. Similarly, ensure that the brush size is not too small to show preview and not too large to move the entire pixels layer.
Why is my Clone Stamp black?
Clone Source settings make Clone Stamp black. First, reset the Clone Stamp for a quick fix. If the problem persists, select the Clone Stamp then go to Window>Clone Source and check the Show Overlay. Set the blending mode to Normal and make sure that Clipped is checked.
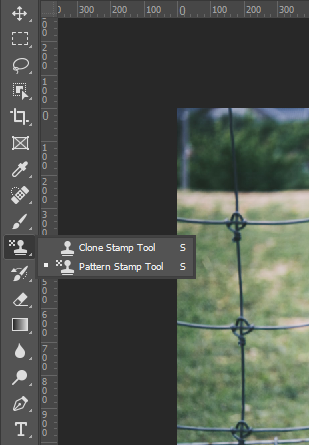
Also, the Clone Stamp turns black when you switch from Clone Stamp to Pattern Stamp. Pattern Stamp paints with a predefined brush pattern instead of copying detail in the selected area if you accidentally make this change.
Error: Could not use the Clone Stamp because the area to clone has not been defined
If you get a pop-up warning reading ‘could not use the Clone Stamp because the area to clone has not been defined,’ it is a layer related or a selection issue.
First Alt + click for PC or Option + Click for Mac on the pixels you want to copy with the Clone Stamp selected. Then release the selection and stamp the copied pixels on the area of choice and the warning should disappear.
Could not use the Clone Stamp because the target layer is hidden
Ensure the Sample All Layers is checked on the options bar. All the working layers should not be hidden, and the cloning source should not be a transparent area on one of the layers. When working with layer masks, make sure that the image area is selected and keep the working layer unlocked and not hidden.
Conclusion
Photoshop Clone Stamp Tool is essential for image pixels replacement from one part of a picture to another. The main cause of the Clone Stamp not working is the tool settings and layers control. Resetting the tool to default solves the problem enables it to function normally.
As for black Clone Stamp, resetting solves it but confirm that you are using the correct Clone Stamp Tool and not the Pattern Stamp Tool. Interchanging them without knowledge leads to frustration.
Defining source layer for sampling and stamping is required when using Clone Stamp Tool. Always start with Alt/Option-click to sample pixels and release the keys before clicking on the area of the layer you are applying the copied pixels. Unhide all the layers you are working on to avoid errors of undefined or hidden target layers.
Is your Photoshop brush laggy?