To save PNG and JPG in higher quality on Illustrator, you have to increase the number of pixels in the image by increasing your artboard size or change your export settings.
To increase your artboard size:
- To begin, select the Artboard tool from the toolbar.
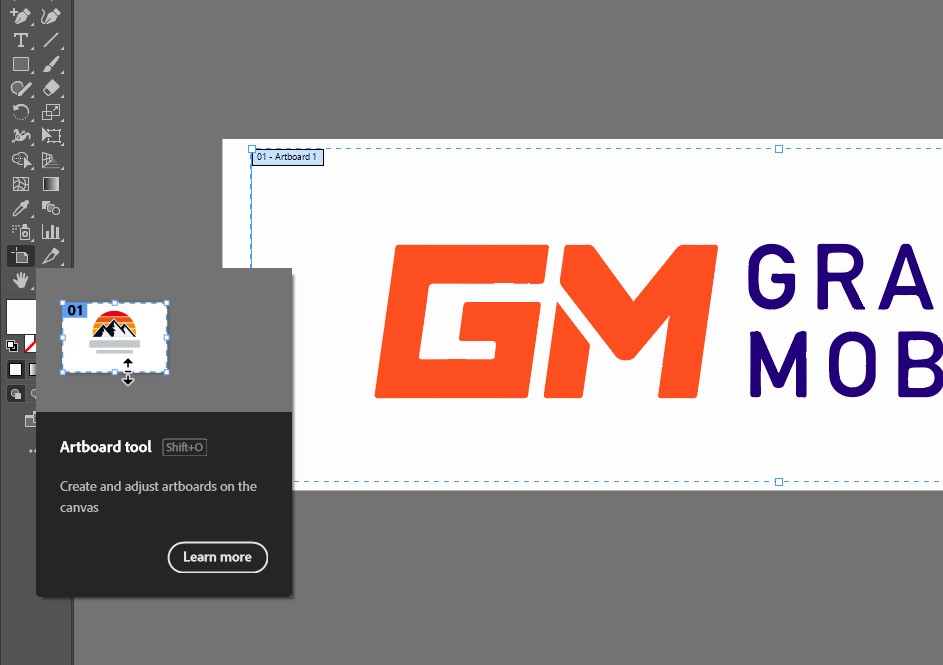
- Next, choose the artboard you want to resize by clicking on it. This will display the blue bounding box around the artboard.
- To adjust the size of the artboard, go to the Artboard options in the Options bar located at the top of your Interface. Here, you can modify the width (W) and height (H) of the artboard by entering new values in the corresponding fields. Alternatively, you can also use the handles in the bounding box to resize the artboard visually.
- Scale your artwork to fit the artboard.
- Click “View” then select “Pixel Preview” to preview the resolution of your exported PNG or export the image to see the results.
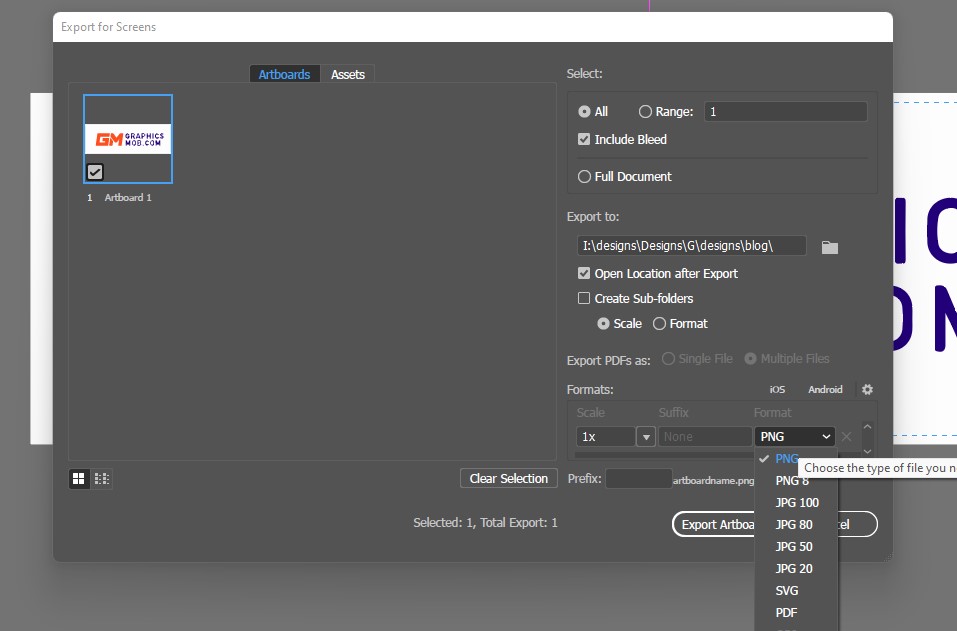
Adjust your export settings to increase the quality of your PNG and reduce the blurriness. To export as PNG or JPG in high quality, go to File>Export>Export For Screens. Under “Format” select JPG 100 or PNG and scale as “1x”. Now click Export Artboard.
JPEG 100 refers to the highest quality setting for saving an image in the JPEG (Joint Photographic Experts Group) file format. When saving an image in JPEG format, there is an option to adjust the quality level, which ranges from 0 to 100. A quality setting of 100 means that the image will be saved with minimal loss of detail and with the highest quality possible.
The other JPEG formats are:
- JPEG 90
- JPEG 80
- JPEG 70
- JPEG 60
- JPEG 50
- and so on…
The lower the quality setting, the more compression will be applied to the image, resulting in a smaller file size but also a decrease in image quality. Conversely, a higher quality setting will result in a larger file size but with a higher level of image detail.
Export at a higher ppi
PNG exports in a crisper, higher quality than JPG and also allows for transparent backgrounds.
Export for screens saves your image at 72 ppi. To export your png or jpg at a higher resolution:
- Go to File > Export > Export As.
- In the Export As dialog box, choose the location where you want to save the file and enter a name for the file.
- Under the Format option, choose JPEG, PNG, whichever format you prefer.
- Under the Options section, select the “Use Artboards” option.
- Under the Resolution option, select medium 150 ppi or 300 ppi in the resolution field.
- Click Ok to save the image.
Illustrator bug
Adobe Illustrator users have reported their program exporting to PNG in low quality and blurry. This is the result of a bug in certain versions of Illustrator 2018 and 2019. To fix this, update your Illustrator to a newer version.
PNG and JPG vs Vector files
PNG and JPG are not vector file like files like AI, PDF and EPS so your image will be composed of pixels which will appear low quality the more you zoom in. If you export it as an image, you are changing the file from a vector-based document (mathematical formula) to a pixel-based image document (rasterized or bitmap). Pixelated images lose quality when scaled up, unlike vector images.
Why does Illustrator file look pixelated in photoshop?
Your exported image from Illustrator appears pixelated in Photoshop because your photoshop document size and/or resolution is larger than the artboard size in Illustrator.
When creating your artwork in Illustrator, set up your new document to have the same width and height in pixels as your photoshop document.
To export your artwork from Illustrator to Photoshop in high quality, make sure your artboard is the same size or larger than the document in photoshop in pixels. Go to File>Document setup>Edit artboards in Illustrator to check and change your artboard size. When exporting to Photoshop, go to File>Export>Export for screens.
Exporting your file as PNG will give you cleaner crisp lines as opposed to exporting as a Jpeg. Make sure the scale is set to 1x and then Export. Your artwork should occupy as much of the artboard before export for the highest quality result. This maximizes the number of pixels the resulting image will contain.
A simple way to export vector artwork from Illustrator to Photoshop is by selecting the objects in Illustrator using the selection tool (v), copying (Ctrl+c/Cmd+c), and pasting in the Photoshop window (Ctrl+v/Cmd+v).
What does export for screens mean in Illustrator?
The Export for screens feature in Illustrator lets you export artboards in different file formats intended for digital display, including png, jpg, SVG, and pdf. Export for screens allows you to export multiple artboards at a time unlike the old Save for web feature where you had to export artboards one at a time.
The export options for PNG format are PNG and PNG 8. PNG is the standard 24-bit PNG and PNG 8 is 8-bit PNG. 24-bit PNG images are able to carry more color information than 8-bit PNGs. For better color accuracy, Export your artboard as a PNG (i.e., PNG 24).
Your PNG export will be larger than PNG 8.
The export options for JPG format are JPG 100, JPG 80, JPG 50 and JPG 20.
JPG 100 has the least compression and gives you a higher quality image while JPG 20 has the highest compression giving you the smallest file size but lowest quality as well.
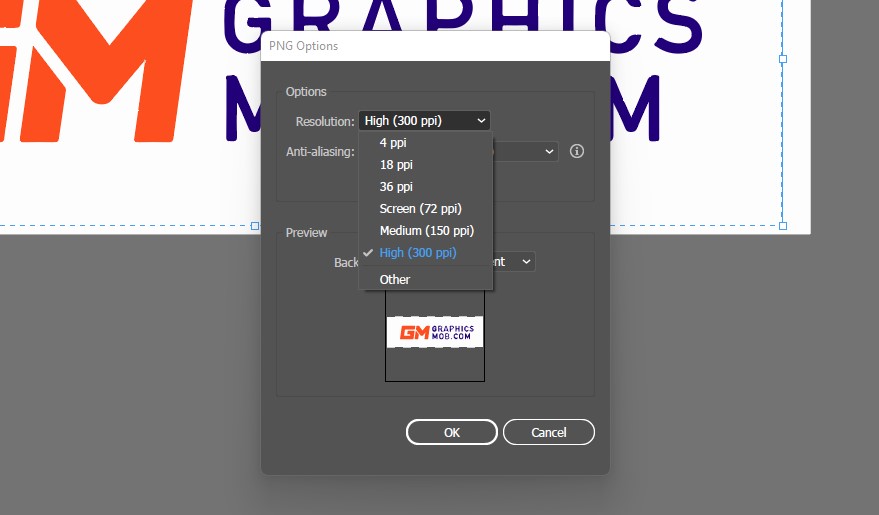
How do I save 300 dpi in Illustrator?
To save your Illustrator document as a 300 DPI PNG or JPG image, go to File>Export>Export As… and choose your preferred file format, that is JPG or PNG. In the options dialog box, click the resolution drop-down and select “High (300ppi)”. Then click ok.
If you are saving as an Illustrator file as vector .ai, .eps or .pdf, make sure you set up your document as 300 DPI in your new document options. If you didn’t do this at the start, create a new document File>New… click advanced options, and select “High (300 PPI)” in the Raster Effects drop-down list.
The solutions above should give you the best high-quality text image for your document size.
You may also be interested in learning: How To Find and Add Pantone Colors in Photoshop.
I hope you found this article helpful. Subscribe to my mailing list and be the first to get helpful graphic design tips and resources.
1 thought on “Why Your Illustrator is Exporting Blurry Images: FIXED!”
Comments are closed.